3 August, 2021| Website Development|18 minutes
How To Optimise Images For Web

As Google looks to refine and tighten their algorithms for user search returns to give them higher quality and more relevant research results, one thing they are targeting is site speed.
Having graphics and images on your website is excellent for adding value, but not at the expense of slowing down your site, reducing your search rankings or frustrating your users looking for instant answers to their specific problems.
Websites that load quickly and respond to user input within a few seconds of a click are rewarded with more significant search engine results.
This is where correctly decreasing your image size without sacrificing quality can make a big difference. In this article, we’ll give you information on which file types are best and how to optimise them for perfect results for your online business.
When you go to select your stock images or when you are editing your own uploaded images, you will see options for different-sized photos and different image file types, which will impact the level of detail you have and the user experience. Next, we’ll go to what each option means so you can make informed choices for your image selections and formatting.
Learning to optimise your images is one of the most important aspects of making your website outperform your competitors.
For more information on choosing the right stock images for your site, see our article: Finding Engaging Images For Your Business Website.
Check out our Stock Image Style Guide to teach your team or third-party providers how to stay on-brand.
Table of Contents
How To Optimise Images For Web
Images make up a large part of your website data, in fact, the only more significant component for data size online is videos. That makes image and animation optimisation a bigger priority than fonts and scripts.
Images on an average website use a hefty 21% of the total website weight.
Luckily, installing image optimisation strategies is easy to do yourself and simple to drive, meaning you have no excuse to overlook it.
What Does It Mean To Optimise Images For Web Performance?
For users to get fast loading times when they visit your website, the site’s information must be as light as possible.
The more data you have on your site, the longer it will take to translate all that to your user’s screen.
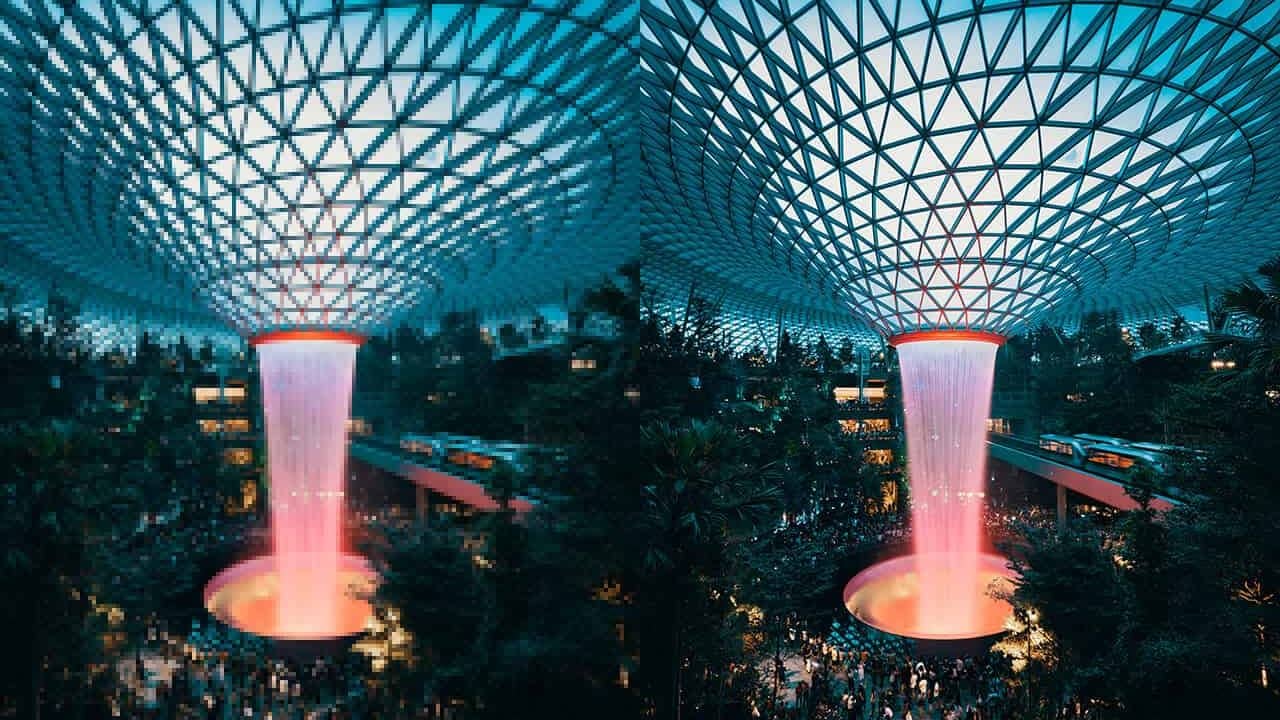
Of course, you can simply reduce the image file size, which will lighten the load and help speed things up, however, in doing so you can lose too much image detail, resulting in cheap and unprofessional images that don’t present your brand in a positive light.
When you optimise your image, you are looking to find a balance between the smallest possible file size and the highest possible quality.
The answer is image optimisation, which involves using programs or manually adjusting the compression of the image until you reach an acceptable quality and a passable file size.
One of the most popular ways to optimise images is to use an automated program to compress them before uploading them to your website.
There are also programs that can edit and optimise your images online, either before or even after publishing your pages, however, there may be original backup images stored on your server that will still hinder loading times and chew up server storage space.
Some programs will delete originals and replace them with the optimised image, and we’ll go into these in more detail below.

What are the main benefits of optimising images?
Large images take time to load, slowing your web page responsiveness and hurting your user experience.
By using a script or plugin you are decreasing the file size so that you optimise the page loading time.
There are multiple benefits to optimising images for your business website:
Improve your SEO
Using many images with large file sizes will slow down your site loading time and user interaction time. This will reflect poorly on search engine algorithms and impact your search engine optimisation (SEO).
When you utilise image optimisation over your entire website, you can decrease your load time by over 50%.
When you combine image optimisation with an SEO plugin you can further optimise for search engine ranking results, placing your website higher up on the search return list and giving more users an opportunity to click to arrive at your website.
Improve your page loading speed
If your page takes too long to load, visitors might get impatient. Slow loading might just be reason enough for them to opt out and look at a competitor’s site instead. As well as losing a potential quality lead, if users close out from your site early, you can get a high bounce rate, which can further hurt your SEO, meaning fewer people have the opportunity to see your online business and get to know your brand.
Decrease your backup time
Combining image optimisation with good housekeeping is a great way to reduce your bandwidth. There are plenty of great tools that allow you to clean up your media library and create archive files.
Cleaning up your used files uses less bandwidth and reduces the storage space you use on your server.
Some platforms, like WordPress, store thumbnails in the media library with the original image retained in full size, unedited. It is best to only upload the optimised version to save disk space, or you can use compression tools that will delete the original and replace it with the smaller file, or a free plugin, like Imsanity, to do the cleanup for you.
Easy ways to reduce your image size
The two primary things to consider when optimising images are:
- File format
- Compression type
By choosing the right combination of file format and compression filter you can reduce your image size up to five times the original volume.
It comes down to trial and error, so be prepared to experiment with each image or file format to see what works best. After some play, you will find patterns that work best for your current and future web images.
Compression
There are two main methods for image compression: Lossy and Lossless
Each option uses different techniques to reduce the file size. The type of file you choose will influence the results you get through your compression filter, so it pays to understand the common image formats and their optimal functions so you can play to their strengths.
Lossy Filter
If you compress with a lossy filter, some data will be deleted. It’s a way of taking a layer of quality out of the image so that overall the image looks the same, however, it won’t have the depth or the quality of the original image.
This is fine on a smaller scale, at a glance, you won’t even notice the difference, but it will be noticeable if the image is blown up large, magnified, or printed. You will also see a drastic reduction in image quality if the compression levels are too high.
The plus side of lossy compression types is that you can significantly reduce the file size.
This is an excellent choice for images that fill articles such as blogs and tip sheets. These are usually stock photos relevant to the article but not essential to your business offering. Most programs offer lossy compression, including Photoshop and Affinity Photo.
Lossless Filter
With lossless filter compression, the quality is maintained but compressed to a smaller scale. This enables users to keep the original data and revert to the full, uncompressed file if needed. The disadvantage here is the reduction in file size is not as significant as lossy.
Overall, lossless compression is best if the quality of the image is vital to your business, for example, product photos, original artworks or digital art.
You can perform a lossless compression with Photoshop, FileOptimizer, or ImageOptim.

What Is The Best File Format For the Web?
Before modifying your images, ensure you’ve downloaded the best file type for your needs.
Each format has its pluses and drawbacks, so you need to consider what aspects are important to keep.
If you don’t have a preference, go for the file size that is the most compatible match for your compression filter.
The files you will consider are .png, .jpeg, .gif, WEBP, and AVIF.
Portable Network Graphic (PNG)
PNG files are high-quality images that typically start much larger than other format types. Initially created as a bitmap with lossless compression, it can also be lossy. These files store digital photos, web graphics and images with transparent backgrounds.
While we would recommend using these for logo files, we would *not* recommend using them for images within an article, as the bigger file size can slow your site down, hurting you in search results.
Joint Photographic Experts Group (JPEG)
A JPEG file is compressed using lossy compression and supports colour up to 24 bits. The lossy format means you can significantly reduce the image size and see a drastic loss of image quality if not balanced correctly.
The advantage to .jpeg files is you have a lot of control when deciding the balance between quality and image size.
JPEG is the most common file format for photo storage. Digital cameras will automatically compress raw photographs to reduce their storage size. When taking your photos, you can alter the quality, which will determine how many images you can store on the camera at that time. When you do this, you are selecting the lossy compression levels; however, once a high compression level has been selected, there is no way to regain the quality that has been lost.
Graphics Interchange Format (GIF)
The GIF file has been around since the 80s, long before computers became capable of beautiful, hi-resolution art, so expect gifs to be a little clunky, although they have the added quality of lossless compression.
This file format uses only 256 colours and is the best choice for animated images. It is not suitable for lossy compression.
WebP
The WebP format is designed to create visually indistinguishable images from JPGs (or PNGs), but with much smaller file sizes. As a result, your website will load faster.
JPEG, PNG, AVIF, and WebP offer superior compression and quality compared to their older counterparts.
In contrast to JPEG or PNG, you can encode your images in these formats to enable faster loading and reduce data consumption.
AVIF
As the next step in media compression, the Alliance for Open Media developed AVIF, an image file format that reduces the size of images without affecting quality.
With its AVIF format, AOMedia intends to create an open, royalty-free technology for multimedia delivery, so nobody will be required to use the format (as opposed to JPG, for example).
AOMedia is backed by big companies like Netflix, Google, Facebook, Apple, and Microsoft and promises images 50% smaller than JPG while still keeping the same image quality.
WordPress has supported both WebP and AVIF natively since the rollout of 5.8 too.
Scalable Vector Graphics (SVG)
The World Wide Web Consortium (W3C) developed the SVG specification. This 2D graphic format is XML-based and supports interactive and animated graphics.
Nowadays, people use different devices with different screen sizes and resolutions to access the Internet. As a result, scalability and responsiveness are more important in web design. Because SVG is a vector graphic, it can scale to fit any web page size.

A quick user’s guide for selecting your file format
- PNG is perfect for quality, detail and high-resolution images like logos
- JPEG is best used for general photos and screenshots
- Compressed GIFs are best for animations
- WebP and AVIF are for uploading even smaller files than JPEG, perfect for image-heavy websites.
- SVG for scalability
Be sure to stick to using the formats listed above.
There are other commonly seen file formats like JPEG XR but we don’t recommend using anything other than those listed above, with the exception of PDFs. Many others are not universally supported by browsers which can cause errors and incomplete images to be shown at the user end. The worst part is you may never see this in testing if your browser does support the other formats.
Getting the right balance
It’s all about that perfect balance between format and compression. To begin with, you are going to want to test every image you upload to your website to see what result you get.
Make sure you test over a wide range of devices to check for variations and use computers that are unfamiliar to you, to help avoid any caches you might be drawing from to fill in the gaps.
With some programs, it’s as easy as selecting the option to save as “image for web”. This will automatically select the best compression option for your file format and the right balance, but it’s best not to trust the program completely until you have some familiarity with the effects.
To start with, play with settings even after the program has compressed the file to see what quality you want to retain.
Compression Quality
Using a medium compression rate you typically get good quality in the image detail and a small enough file size.
As a general rule of thumb for web page size, you want to keep your total webpage weight between one and two MB. That includes your content, scripts, fonts and all images the page has.
When you compress an image too much you can fit more images into your page, however, the detail is lost and the colours will be blocky and images grainy.
Using a high compression rate results in a low-quality image and a smaller file size.
150 KB is a respectable size for a high-resolution photo. For images that are typically simpler than this, look to have your image size come in at 100 KB or under after compression.

The Best Image Optimisation Plugins and Tools
There are plenty of tools available online, some free, some with costs. The highest quality tools come from advanced image programs like Adobe Photoshop, however, there are plenty of other brands to choose from.
As well as using program tools you can opt to use plugins, which can both be fully automated or allow you to manually optimise your photos as you go.
Automated plugins help do the work, or at least some of the work, for you, including optimising and uploading.
Some programs and tools are free and some require paid subscriptions. For the best quality, you can’t go past Adobe Photoshop, which is great for businesses that already have or need this expensive program.
For those on a budget, Affinity Photo will give next to identical results as Photoshop, for a fraction of the price.
Here is a list of the best image optimisation tools you can try
- Adobe Photoshop
- FileOptimizer
- GIFsicle
- Gimp
- ImageOptim
- ImageResize.org
- JPEG Mini
- JPEGtran
- OptiPNG
- Paint.NET
- pngquant
- Trimage
- squoosh.app
The best process to reduce work and make sure there are no originals duplicated on your platform is to resize the image in one of the photo editing tools listed above before you upload it to your site.
From there you can use an additional tool to reduce it further if needed with one of the following online tools:
Imagify Image Optimiser
This tool uses a bulk optimisation feature with three compression levels to choose from.
There is also an option to replace the original image with the optimised one. If you go too far, or change your mind, you can easily restore with a one-click revert feature.
You can use a limited version for free or upgrade to a more sophisticated premium service on a paid subscription.

ShortPixel Image Optimiser
You can use all file types (PNG, JPG, GIF, WebP, and PDF) and compress up to 100 images per month for free as well as run gallery files through in bulk.
The full-size original image is replaced from the newly created cloud file, with the ability to manually access and restore to uncompressed if desired.

Optimole
This WordPress plugin is fully automatic and reliable at finding the perfect balance of size and quality. Comes with a lazy loading feature and image replacement. Trial for free or opt to include premium add-ins, like extra bandwidth, in your overall plan.
EWWW Image Optimiser Cloud
The fully customisable and flexible program allows the automation you choose to be exactly what you need for your image balance and resizing.
Optimus Image Optimiser
This lossless compression program comes with a bulk optimisation feature that you can run through existing published libraries. Both a free and premium version are available.

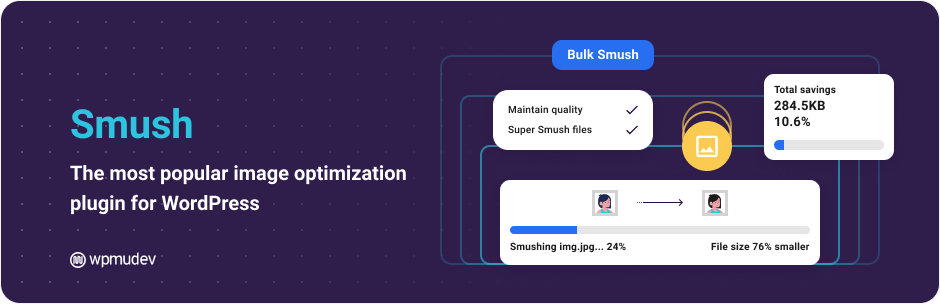
WP Smush
Clever technology reduces hidden information behind images to help reduce the size without impacting quality. Choose from a free or premium version. It can work to compress both as you upload as well as editing any existing images on your website. Able to process as many as 50 images at a time.
TinyPNG
Working with JPG and PNG images, this program can automatically compress new images and bulk compress existing website images. The free account allows you to compress up to 100 images per month. Results are big. Expect image compression to be of stunning quality with as much as 60% reduction in size for JPEG images and up to 80% for PNG images.
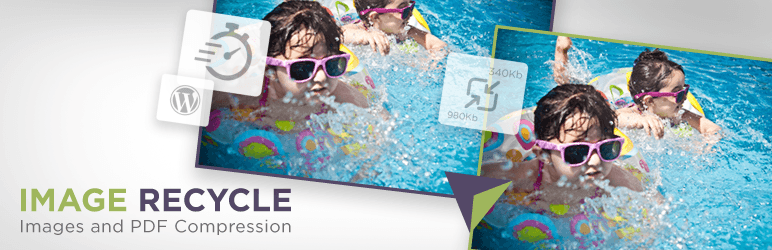
ImageRecycle
This program only offers a paid premium service, however, you can try it for free for 15-days. Fees are charged in bulk lots of image compression numbers, so it can work out to be a great option price-wise for some businesses.
It handles bulk optimisation and auto image resizing for images as well as PDFs. It has automatic features you can set to ensure images are never compressed too much and that smaller images (80KB in size or less) can be excluded from compression.
The Best Ways To Optimise Images For Web
When it comes to how to optimise images for web here are some extra tips to keep in mind:
- Before you upload to your website, have your images saved in the correct dimensions to avoid having the large originals saved as backup files within your website.
- Rather than adding text within an image, use web fonts. They are smaller in data size and look better when scaled.
- Wherever possible use lossy compression to give your images that impressive professional look and feel without the original weight.
- Don’t leave your optimisation to programs and plug-ins alone. Experiment with the settings to find the best outcome for each format and see what works best for your images.
- Check the compression results on different devices to make sure you are happy with the live results.
- Find the tools that can do the bulk of the work automatically so you are not wasting time uploading and deleting original images.
- When using tools like Photoshop select the option to save images as ‘optimised for web’ and get the most out of what these programs can offer.
Once you’ve gone through the process of optimising images for your website you will see faster page loading times that will increase your user experience and search engine rankings.
If you would like any assistance with optimising your images or giving your site a health check, check out our WordPress support packages or get in contact so we can get your website lean and fast.